
MicroPython ESP32: Flash, REPL, and First Script
MicroPython ESP32 runs from firmware for your exact chip: download it from the MicroPython downloads page, erase the flash with esptool, write the firmware at the address shown on the download page, then open Thonny and select MicroPython (ESP32). Type print(1 + 1) in the REPL to confirm the install. Save your program as main.py to run it at boot.
Quick facts
- Firmware: download the .bin file for your exact chip from the MicroPython downloads page.
- Flash tool: esptool, installed with pip install esptool, or the installer inside Thonny.
- Flash address: 0x1000 for ESP32 and ESP32-S2. ESP32-S3 and ESP32-C3 flash at 0x0, so follow the address on the download page for your chip.
- Editor: Thonny, free, with MicroPython support built in.
- Boot files: boot.py runs first at power on, then main.py runs.
What is MicroPython and why use it on ESP32?
MicroPython is a small Python 3 interpreter built for microcontrollers. It runs on ESP32, ESP8266, and Raspberry Pi Pico. You write Python, not C, and you test each line live in the REPL, which is the interactive prompt. That loop is fast for sensors, LEDs, and WiFi tests. A change takes seconds, not a full compile and upload cycle. The cost is speed and memory. MicroPython is slower than compiled C, and it uses more RAM. For a sensor reader, a data logger, or a WiFi dashboard, that cost rarely matters.
MicroPython also changes how you learn. The REPL lets you test a sensor read before you write the full program. Type a line, read the result, fix it, and move on. That habit catches wiring errors early. The ESP32 build of MicroPython includes the machine module for GPIO, the network module for WiFi, and the time module for delays. The standard library is smaller than desktop Python, so check the MicroPython docs before you import a module that your desktop code uses.
Which firmware file does your board need?
Open the MicroPython downloads page and pick your chip, not your board name. A classic DevKit V1 uses the ESP32 generic firmware. A C3 SuperMini uses the ESP32-C3 firmware. An S3 board uses the ESP32-S3 firmware. Each chip has its own build, and the wrong build will not boot. Download the latest stable release unless you need a specific version for a tutorial. Save the .bin file in a folder you can find from a terminal. Note the flash address shown on the download page next to the firmware file. The generic ESP32 build flashes at 0x1000. ESP32-S3 and ESP32-C3 builds flash at 0x0, so use the address on the download page for your chip.
Do not use a firmware file from a random tutorial link. Old builds miss bug fixes and new chip support. The downloads page lists the current stable release and the daily builds. Use the stable release for a first install. The standard ESP32-S3 build auto-detects SPIRAM at startup, so it covers boards with and without PSRAM. Only boards with Octal SPIRAM need the separate spiram-oct variant. The DevKit V1 board in this guide uses the generic ESP32 build, and the C3 SuperMini uses the ESP32-C3 build.
How do you flash MicroPython with Thonny?
Install Thonny from the official Thonny site. Connect the ESP32 board with a USB data cable. Click the interpreter selector in the bottom-right corner of Thonny and choose Configure interpreter. Set the interpreter to MicroPython (ESP32) and select the port for your board. Click the link named Install or update MicroPython (esptool). Pick the MicroPython family for your chip, pick the variant that matches your board, and pick the latest stable version. Click Install and wait. Thonny erases the flash and writes the firmware over USB. The process takes a few minutes.
Thonny bundles esptool, so you do not need to install it separately for this path. A fresh Thonny install may ask to install esptool as a plug-in the first time you open the firmware dialog. Accept that install and try again. If the flash fails partway, lower the baud rate in the dialog and retry. A long or thin USB cable is the most common cause of a failed flash. Use a short, good-quality data cable and a port directly on the computer, not an unpowered hub.
How do you flash MicroPython with esptool?
Install esptool with pip install esptool in a terminal. Find the serial port for your board. On Windows it is COM3 or a higher number. On Linux it is /dev/ttyUSB0. On macOS it is a cu.usbserial device. Erase the flash first with esptool.py –chip esp32 –port PORT erase_flash, with PORT replaced by your port name and esp32 replaced by your chip name for S3 or C3 boards. Erasing clears any old Arduino sketch and gives MicroPython a clean flash. The command prints Chip is ESP32 when it connects. If it prints a timeout, hold the BOOT button and retry.
Write the firmware with esptool.py –chip esp32 –port PORT –baud 460800 write_flash -z 0x1000 firmware.bin, with firmware.bin replaced by the file you downloaded and 0x1000 replaced by the address on the download page for your chip. The -z flag compresses the transfer. If the write fails, drop the –baud 460800 option and retry at the default speed. When the write finishes, reset the board. Open Thonny, select MicroPython (ESP32), and pick the port. The Shell pane should show the MicroPython version and a >>> prompt.
What is the REPL and how do you use it?
The REPL is the Read, Eval, Print, Loop prompt. It runs one line at a time and prints the result. Type print(1 + 1) and press Enter. The REPL prints 2. Type import sys and then sys.version to see the MicroPython version on the board. Type help() for a short list of built-in functions. The REPL is the fastest way to test a sensor or a pin. Connect a sensor, import the driver in the REPL, and read a value before you write a file. If the read fails, the wiring or the driver is wrong, and you find out in seconds.
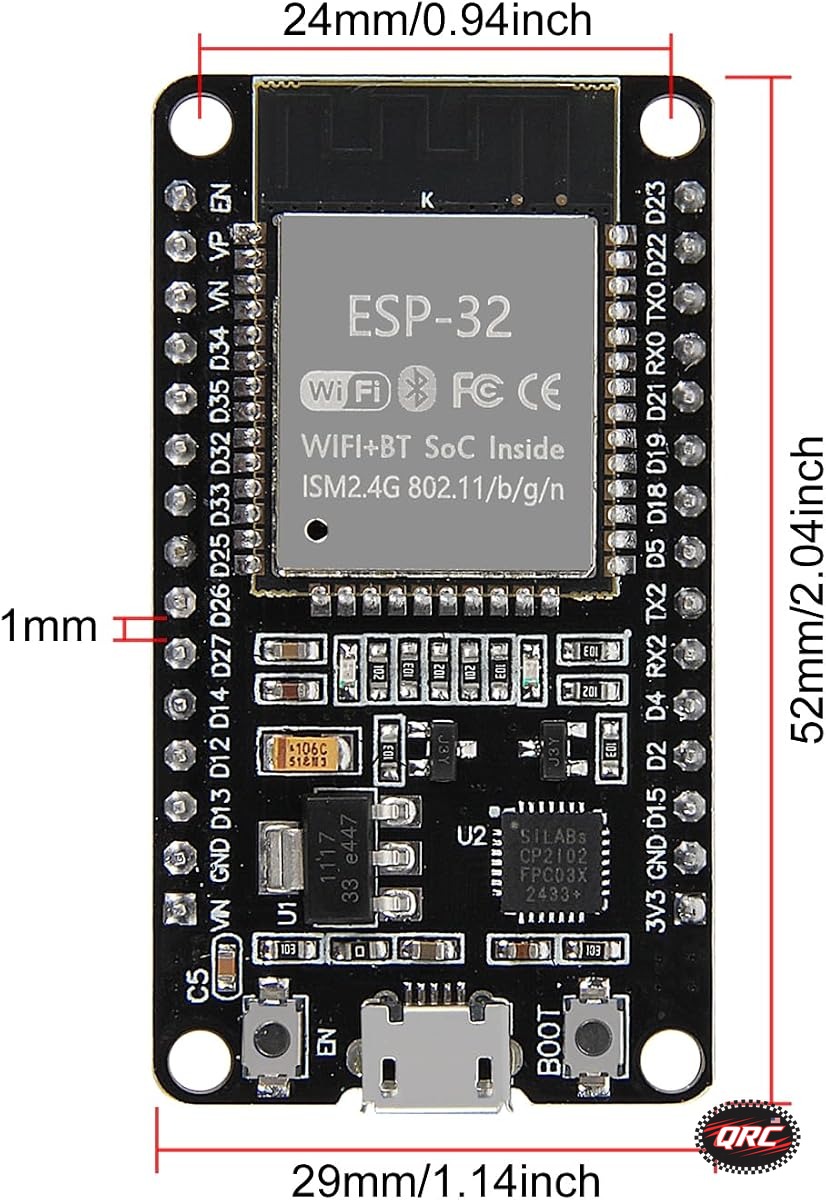
Use the REPL to test the on-board LED. Type from machine import Pin, then led = Pin(2, Pin.OUT), then led.on(). The LED on a DevKit V1 board lights. Type led.off() to turn it off. GPIO 2 is the LED pin on a classic DevKit V1 board. Other boards differ, so check the board documentation for your variant. A C3 SuperMini board may not have a user LED on a fixed GPIO pin. If the LED does not light, the pin number is the first thing to check, not the firmware.
How do you save and run a first script?
Write the program in the Thonny editor pane, not in the Shell. Save it as main.py on the MicroPython device, not on your computer. Thonny asks where to save when you click Run. Pick the MicroPython device and name the file main.py. MicroPython runs boot.py first at power on, then it runs main.py. Do not overwrite boot.py unless you know what it does. A bad boot.py can make the board hard to reach, and recovery means a reflash. Keep boot.py as it shipped and put your code in main.py. That is 2 files in order: boot.py, then main.py.
Test the script with the Run button before you unplug the board. The Shell shows the output and any error. A NameError means a name is misspelled or not imported. An ImportError means a module is missing from the board. A ValueError from a Pin call usually means the pin number is wrong for the board. Fix the error in the editor, save again, and click Run. When the script works, unplug the board and plug it back in. The script should start on its own, because main.py runs at boot. That is the test that matters.
Step-by-step: MicroPython ESP32 flash and first Blink
- Download the MicroPython firmware .bin file for your exact chip from the MicroPython downloads page. Note the flash address on that page.
- Install Thonny from the official Thonny site, or install esptool with pip install esptool for the command-line path.
- Connect the board with a USB data cable and find the serial port name.
- Erase the flash: esptool.py –chip esp32 –port PORT erase_flash, or use the Install link in the Thonny interpreter dialog.
- Write the firmware: esptool.py –chip esp32 –port PORT –baud 460800 write_flash -z 0x1000 firmware.bin, with the address and file name from the download page.
- Open Thonny, select MicroPython (ESP32) as the interpreter, and pick the port.
- Type print(1 + 1) in the Shell and confirm the REPL prints 2.
- Save the Blink script below as main.py on the MicroPython device.
- Click Run, watch the LED blink, then unplug and replug the board to confirm the script starts at boot.
Firmware and LED pin for each board in this guide
| Board in stock | MicroPython firmware | On-board LED pin | Notes |
|---|---|---|---|
| ESP32 DevKit V1, 30-pin | ESP32 generic | GPIO 2 | Flash address 0x1000 |
| ESP32-C3 SuperMini | ESP32-C3 | Check board docs | Flash address 0x0. Use the address on the download page |
| ESP32-S3 DevKitC-1 | ESP32-S3 | GPIO 48 (board v1.0) or GPIO 38 (board v1.1), addressable RGB LED | Flash address 0x0. Standard build auto-detects SPIRAM; Octal SPIRAM boards need the spiram-oct variant |
First code to run
Save this file as main.py on the MicroPython device in Thonny. It blinks the on-board LED once per second and prints each state to the REPL.
# main.py - MicroPython Blink for ESP32
# Board: ESP32 DevKit V1 (generic ESP32 firmware)
# Library: machine (built into MicroPython, no install needed)
from machine import Pin
from time import sleep

# GPIO 2 is the on-board LED pin on a classic DevKit V1 board.
led = Pin(2, Pin.OUT)

while True:
    led.on()      # Turn the LED on
    print("LED on")
    sleep(1)      # Wait 1 second
    led.off()     # Turn the LED off
    print("LED off")
    sleep(1)      # Wait 1 second
On a C3 SuperMini board, replace Pin(2, Pin.OUT) with the LED pin from the board documentation. Do not guess the pin number.
Frequently asked questions
Is MicroPython slower than Arduino on ESP32?
Yes. MicroPython runs Python bytecode through an interpreter, so it is slower than compiled C. For sensor reads, LED control, and WiFi requests, the speed is enough. For tight timing or high-speed sampling, use Arduino or ESP-IDF.
Can I go back to Arduino after flashing MicroPython?
Yes. Flash an Arduino sketch over USB in the normal way. The Arduino upload erases the MicroPython firmware and writes the sketch. Flash MicroPython again when you want Python back.
Why does Thonny not show the ESP32 port?
Check the cable and the driver first. A charge-only cable gives no port. A missing CH340 or CP2102 driver also gives no port. Unplug the board and watch the port list change to confirm the port belongs to your board.
What is the difference between boot.py and main.py?
boot.py runs first at power on, then main.py runs. Keep boot.py as it shipped and put your program in main.py. A broken boot.py can block the REPL and force a reflash.
How much memory does MicroPython have on ESP32?
The exact free RAM depends on the chip and the firmware build. Type import gc and gc.mem_free() in the REPL to read the free heap on your board. Large lists and long strings use RAM fast, so keep buffers small.
Parts used in this guide
This guide flashes MicroPython on the ESP32 DevKit V1 board and the C3 SuperMini board linked below. Pick the firmware for your exact chip from the MicroPython downloads page.
- ESP32 DevKit V1 Development Board, 30-Pin WROOM-32, WiFi + Bluetooth, Dual-Core
- ESP32-C3 SuperMini Development Board 4-Pack
Related guides
- ESP32 vs ESP32-S3 vs ESP32-C3 vs ESP32-C6: Which Chip for Your Project
- How to Set Up Arduino IDE for ESP32 Boards
- MicroPython on Raspberry Pi Pico: Flash and First Script
Sources
- MicroPython ESP32 getting started guide
- MicroPython install on ESP32
- MicroPython with esptool and Thonny
Last updated: 2026-11-21