
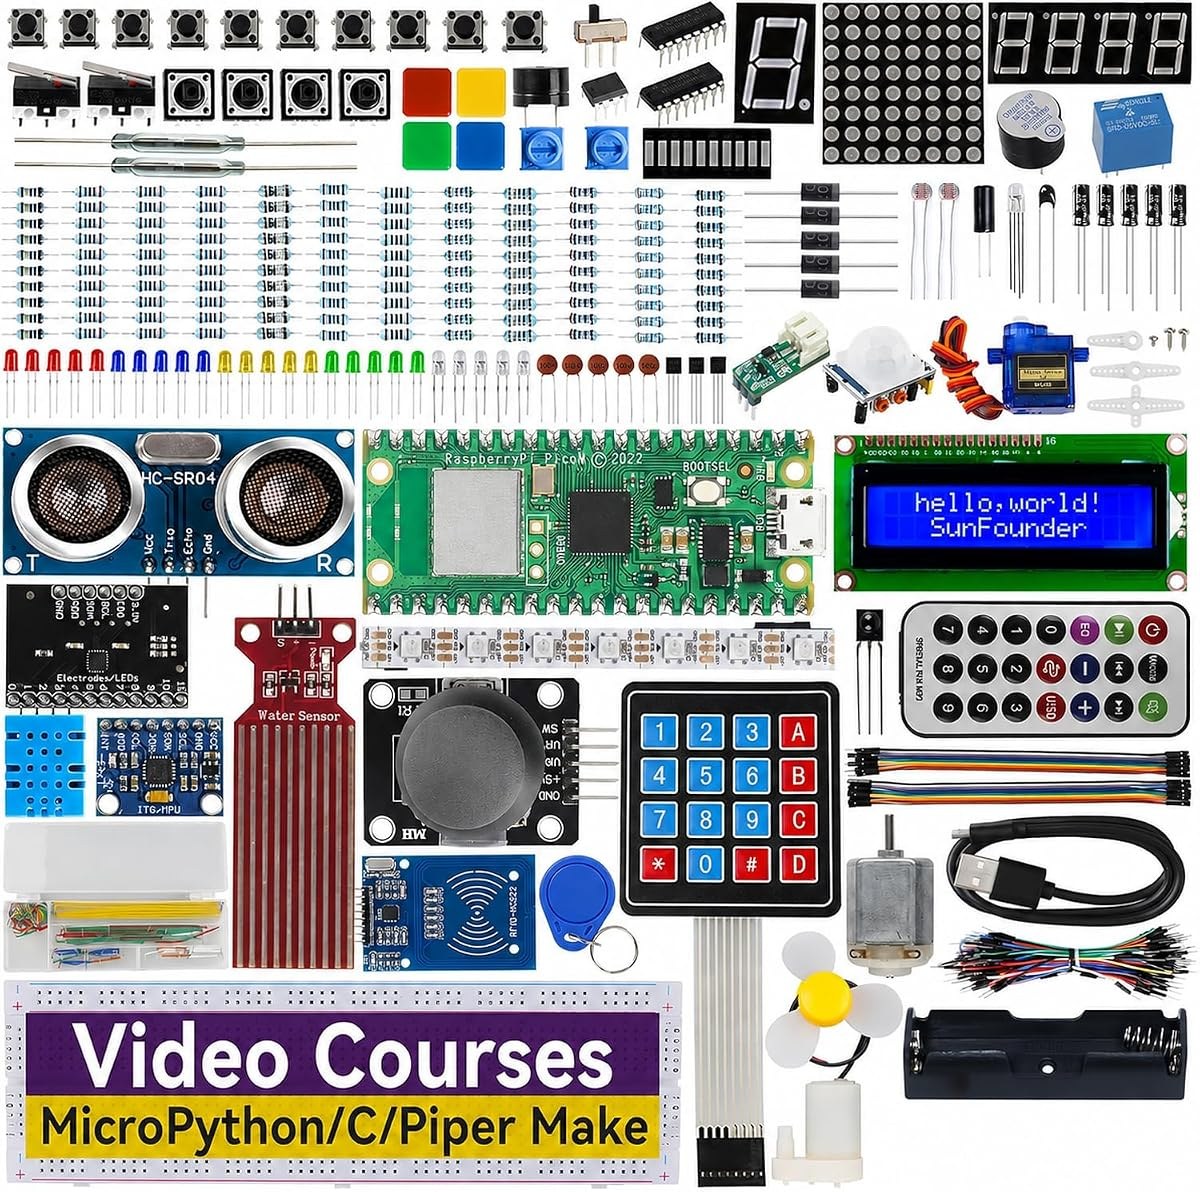
Summary: A Raspberry Pi Pico starter kit should match the learner, not just the parts count. The SunFounder Pico W kit is the fullest path, with 450 plus components, 117 projects, and 27 video tutorials. The LAFVIN kit is the classic guided set, with an LCD1602 display, an SG90 servo, a sensor, an LED strip, and buttons. The Keyestudio kit is the minimal start for a builder who already has parts, and the UCTRONICS GPIO breakout kit is for a Pico owner who wants cleaner wiring.
A Raspberry Pi Pico starter kit should match the learner, not just the parts count. The SunFounder Pico W kit is the fullest path, with 450 plus components, 117 projects, and 27 video tutorials. The LAFVIN kit is the classic guided set, with an LCD1602 display, an SG90 servo, a sensor, an LED strip, and buttons. The Keyestudio kit is the minimal start, with the Pico board, headers, and a micro USB cable for a builder who already has parts. The UCTRONICS kit is a GPIO breakout with a breadboard and wires for a Pico owner who wants cleaner wiring.
Table of contents
- Which kit should you buy first?
- SunFounder Pico W Ultimate Starter Kit: is it the best first kit?
- LAFVIN Pico starter kit: what do you get for the lowest complete-kit price?
- KEYESTUDIO Pico basic starter kit: who is a board-only kit for?
- UCTRONICS GPIO breakout kit: what if you already own a Pico?
- How is each kit taught?
- Which kit fits you?
- Pico vs Pico W vs Pico 2: which board is inside your kit?
- How do you start your first project?
- Waveshare 1.3 inch LCD display: should you add a screen?
- Finish the kit: case, headers, and spare pins
- What mistakes do beginners make with Pico kits?
- Why is my Pico kit not working?
- What should you buy?
- Parts used in this guide
- FAQ
Which kit should you buy first?
Buy the SunFounder Raspberry Pi Pico W Ultimate Starter Kit first if you want one kit that covers the whole beginner path. It is the first-kit pick in this guide: a Pico W board, 450 plus components, 117 projects, and 27 video tutorials, with MicroPython, C and C++, and Piper Make. Buy the LAFVIN Basic Starter Kit for Raspberry Pi Pico if money is tight and you still want a complete kit. At $34.99 it is the cheapest complete kit in this guide, with the board, an LCD1602 display, an SG90 servo, a sensor, an LED strip, and buttons. The Keyestudio kit at $17.99 costs less, but it is a board plus headers and cable, not a parts kit, so it is not a budget pick for a first build.
Kit comparison table
| Kit | Board | What stands out | Programming support | Level |
|---|---|---|---|---|
| SunFounder Pico W Ultimate Starter Kit (ID 20340) $104.99 | Raspberry Pi Pico W | 450+ components, 117 projects, 27 video tutorials | MicroPython, C/C++, Piper Make | Beginner, ages 8+ |
| LAFVIN Basic Starter Kit for Raspberry Pi Pico (ID 20339) $34.99 | Raspberry Pi Pico, RP2040 | LCD1602, SG90 servo, sensor, WS2812 strip, buzzer, buttons | MicroPython, C/C++, Piper Make | Beginner |
| KEYESTUDIO Raspberry Pi Pico Basic Starter Kit (ID 20338) $17.99 | Raspberry Pi Pico, RP2040 | Board, headers, and micro USB cable; no extra parts | C and MicroPython | Builder who already has parts |
| UCTRONICS GPIO Breakout Kit for Raspberry Pi Pico (ID 20337) $17.99 | No board included | T-type breakout, 830-point breadboard, 65 jumper wires | Not stated; no teaching material | Pico owner |
| Waveshare 1.3 Inch LCD Display Module for Raspberry Pi Pico (ID 20344) $20.99 | Add-on, not a kit | 240×240 IPS screen, joystick, 4 buttons, SPI | Not stated | Any Pico builder |
Prices are live QRC prices from 2026-11-21. The SunFounder kit lists at $104.99 on sale ($125.99 regular), the LAFVIN kit at $34.99 ($42.99 regular), the Keyestudio kit at $17.99 ($21.99 regular), the UCTRONICS kit at $17.99 ($21.99 regular), and the Waveshare display at $20.99 ($25.99 regular).
SunFounder Pico W Ultimate Starter Kit: is it the best first kit?
Yes, for a first kit. The SunFounder Pico W Ultimate Starter Kit is the fullest path in this guide, and it is the first-kit pick. It is an IoT starter kit for beginners aged 8 and up, built around the Pico W, with 450 plus components, 117 projects, and 27 video tutorials by educator Paul McWhorter. It supports MicroPython, C and C++, and Piper Make, and it includes sensors, actuators, LEDs, and LCDs. It is RoHS compliant, with a community forum and technical help.
The size is the point. A beginner who buys this kit does not run out of parts after the first ten projects. The 117 projects run from blink and sensor reads up to IoT projects on the Pico W wireless connection, so the same box covers the first month and the sixth month. The video lessons matter as much as the parts: a beginner who gets stuck on wiring can watch the step instead of reading a wiring diagram cold. The listing says to work through the 117 projects with the video lessons, starting with blink and sensor reads, then building IoT projects on the Pico W wireless connection.
The trade-off is price and size. At $104.99 it costs about three times the LAFVIN kit, and a box with 450 plus components can feel like a lot to sort on day one. That is the honest cost of a kit that lasts: you pay once for a full curriculum instead of buying parts in small batches. If the learner is sure they want to learn microcontrollers, and not just try one project, this is the kit to buy.
Verdict: Best first kit. Buy it if you want one purchase to cover the whole beginner path, with video teaching and a Wi-Fi board.
LAFVIN Pico starter kit: what do you get for the lowest complete-kit price?
A complete guided set for $34.99. The LAFVIN Basic Starter Kit for Raspberry Pi Pico is built on the Pico with the RP2040, for e-learning and embedded project development. It supports MicroPython, C and C++, and Piper Make graphical programming for users at different learning stages. The kit includes an LCD1602 display module, SG90 servo motor, human body sensing module, WS2812 RGB LED strip, buzzer, and buttons, covering display, input, sensing, and execution control. Detailed project tutorials and sample code help with circuit connections, program downloads, and experimental verification.
This is the classic shape of a starter kit: one display, one servo, one sensor, one LED strip, one buzzer, and buttons. Every part in the box maps to a project a beginner recognizes: print text on the LCD, move the servo, light the strip, sound the buzzer, read a button. The listing suggests starting with a blink project, then driving the LCD1602 display, moving the SG90 servo, and lighting the WS2812 LED strip. That order teaches output first, then input, then the two together.
The trade-off is the board. The LAFVIN kit ships the standard Pico, not the Pico W, so it has no Wi-Fi and no Bluetooth. That is fine for learning GPIO, sensors, displays, and servos, and it is a real limit only when the learner wants a connected project, such as a web dashboard or a sensor that reports over Wi-Fi. The kit also states no component count and no project count on the QRC listing, so do not compare it to the SunFounder kit on numbers. Compare it on parts: it has the parts a beginner needs, and nothing the beginner does not.
Verdict: Best budget pick. Buy it if you want the cheapest complete kit with a display, a servo, and guided tutorials.
KEYESTUDIO Pico basic starter kit: who is a board-only kit for?
A builder who already has parts. The KEYESTUDIO Raspberry Pi Pico Basic Starter Kit is the minimal kit in this guide: a basic starter kit built around the Raspberry Pi Pico, with headers and a micro USB cable included. The RP2040 board lists a dual-core Arm Cortex-M0+ processor, 264 KB of RAM, up to 16 MB of off-chip flash, and a clock up to 133 MHz. The board has 26 multifunction GPIO pins, including 3 analogue inputs, 2 UART, 2 SPI controllers, 2 I2C controllers, and 16 PWM channels, with 8 programmable I/O state machines. It programs in C and MicroPython with drag-and-drop over USB.
This kit makes sense in exactly one situation: the builder already owns a breadboard, jumper wires, LEDs, resistors, and sensors, and mainly needs the board, headers, and cable to start. The listing says to fit the headers, connect the micro USB cable, and load MicroPython or C with drag-and-drop programming over USB, then run a blink script first and work through GPIO, PWM, and PIO examples with the 26 GPIO pins. There is no tutorial named in the listing, so a true beginner who buys this kit is learning from outside guides, not from the box. That is workable, since the Raspberry Pi documentation covers the Pico in MicroPython and C, but it is slower than a kit with its own projects.
The board itself is the genuine Pico spec, confirmed by the Raspberry Pi Pico datasheet: dual-core Cortex-M0+ up to 133 MHz, 264 KB SRAM, 2 MB flash on the board, 26 multifunction 3.3V GPIO pins, drag-and-drop programming over USB. The listing also notes an on-chip temperature sensor, which is on the Pico chip itself, not a separate sensor module. Do not expect a temperature sensor part in the box.
Verdict: Best minimal start. Buy it only if you already own parts and just need the board, headers, and cable.
UCTRONICS GPIO breakout kit: what if you already own a Pico?
Buy the breakout, not another parts kit. The UCTRONICS GPIO Breakout Kit for Raspberry Pi Pico is not a parts kit and it does not include a Pico board. It is a GPIO breakout kit that makes experiments more convenient: the breadboard and T-type expansion board connect the board to sensors and electronic components through the GPIO extension board. The package includes an assembled T-type expansion board, an 830-point breadboard, a 40-pin ribbon cable, and 65 jumper wires.
The value is in the wiring. A Pico plugged straight into a breadboard works, but the pin labels sit under the board where you cannot read them, and every wire change means counting pins from the edge. The T-type breakout spreads the pins out on a labeled board, and the ribbon cable carries them to the breadboard, so the pin you want is the pin you can see. The listing says to connect the T-type expansion board to the breadboard with the ribbon cable, plug a Pico into the expansion board, and wire sensors and components through the labeled GPIO breakout with the 65 jumper wires.
Buy this kit when you already own a Pico board and parts and want cleaner wiring. Do not buy it as a first kit: with no board and no parts, it builds nothing on its own. Pair it with the Keyestudio kit if you are starting from zero and want the board plus tidy wiring, or pair it with any kit in this guide once the loose wiring starts slowing you down.
Verdict: Best wiring upgrade. Buy it if you own a Pico and want labeled, tidy GPIO access.
How is each kit taught?
The teaching format is the real difference between the two complete kits. SunFounder teaches by video, LAFVIN teaches by written tutorials and sample code, and the two minimal kits teach nothing on their own.
| Kit | Tutorial format | What the live listing states |
|---|---|---|
| SunFounder Pico W Ultimate | Video lessons plus online tutorials | 27 video tutorials by Paul McWhorter; 117 projects; online tutorials |
| LAFVIN Basic | Online tutorials plus sample code | Detailed project tutorials and sample code |
| KEYESTUDIO Basic | Not stated | Listing names no tutorial; board programs in C and MicroPython with drag-and-drop over USB |
| UCTRONICS GPIO breakout | None | Breakout kit; no teaching material stated |
Video suits a learner who wants to watch each build before wiring it. Written tutorials with sample code suit a learner who wants to read the wiring diagram, copy the code, and run it. Neither format is better in general. The question is which one the learner will actually follow. A beginner who learns by watching should pick the SunFounder kit. A beginner who is comfortable reading diagrams and code should find the LAFVIN tutorials enough, and the lower price leaves money for the next part. A builder who buys the Keyestudio kit should plan to learn from the Raspberry Pi documentation, which covers the Pico in MicroPython and C, and from the QRC board comparison page linked below.
Which kit fits you?
Match the kit to the reader, not to the parts count. Five reader types cover nearly every buyer of this guide.
First kit, complete beginner. Buy the SunFounder Pico W Ultimate Starter Kit. It has the board, the parts, the projects, and the video lessons in one box, and it is built for beginners aged 8 and up. No other kit in this guide teaches as much on its own.
Tight budget, still want a complete kit. Buy the LAFVIN Basic Starter Kit. At $34.99 it is the cheapest complete kit here, with a display, a servo, a sensor, an LED strip, and buttons, plus tutorials and sample code. It has no Wi-Fi, so skip it only if the first project must be wireless.
Already own a Pico. Buy the UCTRONICS GPIO Breakout Kit. It adds a labeled T-type breakout, a full-size 830-point breadboard, a ribbon cable, and 65 jumper wires to the board and parts you already have. Do not buy another parts kit to fix messy wiring.
Want a screen. Buy the LAFVIN kit, which includes the LCD1602 display, or add the Waveshare 1.3 inch LCD display to any kit. The LAFVIN display is a character LCD for text and numbers. The Waveshare display is a 240×240 color IPS screen with a joystick and four buttons, which suits a small game or a menu, not just text.
Want Wi-Fi. Buy the SunFounder kit. It is the only kit in this guide built around the Pico W, with 2.4 GHz Wi-Fi and Bluetooth 5.2. The LAFVIN and Keyestudio kits ship the standard Pico, which has no wireless. If the project is a web dashboard, a sensor that reports over Wi-Fi, or any connected build, the Pico W board is the requirement, and the SunFounder kit is the way to get it with parts and teaching included.
Pico vs Pico W vs Pico 2: which board is inside your kit?
The board decides wireless and speed, not the parts. The SunFounder kit ships the Pico W. The LAFVIN and Keyestudio kits ship the standard Pico. This guide lists no Pico 2 W kit. The table below is confirmed by the QRC board comparison page and by the official Raspberry Pi Pico-series documentation.
| Board | Chip | Clock | SRAM | Flash | Wireless |
|---|---|---|---|---|---|
| Raspberry Pi Pico | RP2040 | Up to 133 MHz | 264 KB | 2 MB | None |
| Raspberry Pi Pico W | RP2040 | Up to 133 MHz | 264 KB | 2 MB | 2.4 GHz Wi-Fi, Bluetooth 5.2 |
| Raspberry Pi Pico 2 | RP2350 | Up to 150 MHz | 520 KB | 4 MB | None |
| Raspberry Pi Pico 2 W | RP2350 | Up to 150 MHz | 520 KB | 4 MB | Wi-Fi, Bluetooth 5.2 |
Three facts matter for a kit buyer. First, Pico and Pico W share the same RP2040 chip, the same speed, and the same memory. The W adds wireless and nothing else, so a wired project runs the same on either board. Second, Pico 2 and Pico 2 W use the RP2350 chip, with faster Cortex-M33 cores, about double the memory, and double the flash. Third, the W suffix means wireless, and the H suffix means pre-soldered headers, per the Raspberry Pi documentation. A Pico WH is a Pico W with headers fitted. None of the kits in this guide is built around a Pico 2 or Pico 2 W board, so do not buy one of these four kits expecting RP2350 hardware. For the full board-by-board comparison, including headers and cables, read Raspberry Pi Pico vs Pico W vs Pico 2.
How do you start your first project?
Start with blink, then add one part at a time. Every kit in this guide follows the same first steps, and the order matters more than the language.
- Fit the headers if the board ships without them. The Keyestudio kit includes headers that need fitting before the board goes on a breadboard. Boards with an H suffix, or listed with headers, ship with them fitted. Raspberry Pi documentation notes that models without the H suffix need pins fitted manually or a third-party pin kit.
- Connect the board to your computer with a micro USB cable that carries data, not a charge-only cable. The Keyestudio kit includes a micro USB cable. A charge-only cable powers the board but never shows it on the computer.
- Load MicroPython or C with drag-and-drop programming over USB. The Pico appears as a USB drive, and the firmware file is dragged onto it. This is how the Raspberry Pi Pico datasheet and the Keyestudio listing both describe programming the board. MicroPython is the recommended starting language: it gives instant feedback, and every kit in this guide supports it.
- Run a blink script first. Blink proves the board, the cable, the firmware, and the editor all work before any sensor or display is involved. If blink fails, the fault is in the setup, not in the project wiring.
- Add one part per project. The LAFVIN listing suggests the order: blink, then the LCD1602 display, then the SG90 servo, then the WS2812 LED strip. The SunFounder listing suggests the same shape: blink and sensor reads first, then IoT projects on the Pico W wireless connection. One new part per project keeps each failure small enough to find.
Waveshare 1.3 inch LCD display: should you add a screen?
Add it when the project needs to show something, not just blink. The Waveshare 1.3 inch LCD display for Pico is the display add-on that turns a kit into a visible project. The 1.3 inch LCD module works with the Pico, with 240×240 resolution, an IPS screen showing 65K RGB colors, and an ST7789 driver chip over SPI. The SPI interface requires minimal IO pins, and the module includes 1 joystick and 4 user buttons for easy interaction. It is compatible with the Raspberry Pi Pico header.
The joystick and buttons are the reason to pick this display over a plain screen. They turn the display into an input device, so the next project after the kit projects can be a small game, a menu, or a meter with controls, instead of another blinking LED. Pick it to add a screen, joystick, and buttons to any Pico kit in this guide. At $20.99 it costs less than the LAFVIN kit and fits any of the four kits, since it plugs onto the Pico header.
Verdict: Best screen add-on. Buy it when the kit projects run out and the next build needs a display with input.
Finish the kit: case, headers, and spare pins
Three add-ons complete a kit build. None of them is required on day one, and all three fix a real annoyance once the building starts.
The C4Labs Zebra Pico Case, Black Ice (ID 20341) $16.99 is an ultra-compact case compatible with the original Pico, Pico W, Pico 2, and Pico 2 W, with access to the GPIO and debugging pinout and full access to the button, made from acrylic and stainless steel in Black Ice. The board is not included. Buy it when the finished project needs to leave the bench without shorting on a stray wire.
The GPIO Extender Header Kit, 14-Piece (ID 20342) $17.99 is a 14-piece kit with stacking female headers in three pin lengths, 12 mm, 10.7 mm, and 5.5 mm, plus 2×20 pin headers, 1×20 pin headers, and 1×3 pin headers, with gold plated contacts at 2.54 mm pitch, for Raspberry Pi, Pi Zero, and Pico. Buy it when you need to stack a board above another board, or when the header length in the kit does not fit the case.
The Pin Header Set, 30-Piece for Raspberry Pi Pico (ID 20343) $11.99 gives 30 male pin headers in 10 sets for the Raspberry Pi Pico, at 2.54 mm pitch, with 20-pin and 3-pin male-to-male headers in copper and plastic. Buy it as spares: headers are cheap, and a bent or shorted pin should not stop a build.
What mistakes do beginners make with Pico kits?
Most first-kit frustration traces to a small set of avoidable mistakes. Every row below is a mistake real beginners make, and the fix is cheap.
| Mistake | What happens | Fix |
|---|---|---|
| Buying a kit without checking whether the board is included | The UCTRONICS kit has no Pico board, so it builds nothing alone | Read the listing: board included, or board not included |
| Buying the plain Pico when the project needs Wi-Fi | The LAFVIN and Keyestudio boards have no wireless, so a connected project stalls | Buy the Pico W kit (SunFounder) when the project must connect |
| Skipping the headers | A board without fitted headers cannot plug into a breadboard | Fit the headers first, or buy a board with headers fitted |
| Using a charge-only USB cable | The board powers up but never appears on the computer | Use a data cable; the Keyestudio kit includes one |
| Wiring 5V parts to 3.3V GPIO | The Pico GPIO pins are 3.3V, per the Raspberry Pi Pico datasheet | Check each part for 3.3V compatibility before wiring it |
| Starting in C instead of MicroPython | Slower first results and harder debugging for a beginner | Start in MicroPython, move to C when speed or timing demands it |
| Skipping blink and wiring the full project first | A failure could be the board, the cable, the code, or the wiring, with no way to tell which | Run blink first, then add one part per project |
| Buying the biggest kit to “cover everything” | A 450-part box can stall a learner who only wanted three projects | Buy the LAFVIN kit if the goal is a few guided projects, not a full curriculum |
| Expecting a tutorial in every box | The Keyestudio kit names no tutorial, and the UCTRONICS kit has none | Plan to learn from the Raspberry Pi docs if the kit has no tutorial of its own |
Two of these deserve emphasis because they look harmless. The charge-only cable is the classic first-day failure: the board lights up, nothing appears on the computer, and the beginner blames the board. And skipping blink is the mistake that turns every later fault into a mystery: a blink that works proves the setup, so any later failure is in the new wiring, not in the board.
Why is my Pico kit not working?
Work through the cause in order, cheapest check first. Most Pico kit faults are the cable, the headers, or the firmware, not the board.
The board does not show up on the computer. The cable is the usual fault. Swap in a known data cable, not a charge-only cable. Then check the USB port and try another one. If the board still does not appear, hold the BOOTSEL button while you plug the board in, then release it: the board should appear as a USB drive. The BOOTSEL step is the standard Raspberry Pi procedure; confirm it against the Raspberry Pi docs if this guide is ever re-edited.
Thonny or the editor cannot see the Pico. MicroPython may not be loaded on the board. Flash the MicroPython firmware file by dragging it onto the USB drive the board shows as, then reopen the editor. The Pico programs by drag-and-drop over USB, per the Raspberry Pi Pico datasheet.
Blink runs, but the sensor or display does nothing. The wiring is the fault, not the board. Check the part against the tutorial wiring diagram pin by pin, and check that the part shares ground with the Pico. A part wired to the wrong GPIO pin fails silently: the code runs, the part never sees it.
The LCD shows nothing. Check the wiring against the tutorial first, then check that the display code matches the display type: an LCD1602 character display and a 240×240 SPI display do not share code. The LAFVIN kit uses the LCD1602, and the Waveshare add-on uses the ST7789 over SPI.
The servo does not move. Check that the servo signal wire is on the pin the code uses, and check the servo power. A small servo needs its own power supply for reliable movement; do not expect the Pico 3.3V pin to drive it.
The WS2812 strip flickers or shows wrong colors. Check that the strip shares ground with the Pico, and check the data wire is on the pin the code uses. A loose ground is the usual cause of flicker on an addressable strip.
What should you buy?
Buy for the learner, not for the parts count. Three picks cover nearly every buyer of this guide.
If this is the first kit and the learner wants to learn properly, buy the SunFounder Pico W Ultimate Starter Kit at $104.99. It is the only kit here with a Wi-Fi board, video lessons, and 117 projects in one box. It is the most expensive kit in this guide, and it is also the only one that does not need a second purchase to keep learning.
If money is tight, buy the LAFVIN Basic Starter Kit at $34.99. It is a complete kit with a display, a servo, a sensor, an LED strip, and buttons, plus tutorials and sample code. It has no Wi-Fi, so it suits learning GPIO, sensors, and displays, not connected projects.
If you already own parts, buy the KEYESTUDIO Pico Basic Starter Kit at $17.99 for the board, headers, and cable. If you already own a Pico too, buy the UCTRONICS GPIO Breakout Kit at $17.99 for tidy wiring instead. Add the Waveshare 1.3 inch LCD display at $20.99 when the next project needs a screen with input, and add the C4Labs Zebra Pico Case at $16.99 when the finished build needs to leave the bench.
Parts used in this guide
All products below were in stock when this guide was updated on 2026-11-21.
- SunFounder Raspberry Pi Pico W Ultimate Starter Kit, 450+ Items, 117 Projects, MicroPython and C/C++, $104.99 on sale (regular $125.99).
- LAFVIN Basic Starter Kit for Raspberry Pi Pico, LCD1602 Display, SG90 Servo, WS2812 LED, MicroPython and C/C++, $34.99 on sale (regular $42.99).
- KEYESTUDIO Raspberry Pi Pico Basic Starter Kit with Headers and Micro USB Cable, RP2040, $17.99 on sale (regular $21.99).
- UCTRONICS GPIO Breakout Kit for Raspberry Pi Pico, T-Type Breakout + 830-Point Breadboard + Jumper Wires, $17.99 on sale (regular $21.99).
- Waveshare 1.3 Inch LCD Display Module for Raspberry Pi Pico, 240×240 IPS, ST7789, SPI, $20.99 on sale (regular $25.99).
- C4Labs Zebra Pico Case for Raspberry Pi Pico, Pico W, Pico 2 and Pico 2 W, Black Ice, Board Not Included, $16.99 on sale (regular $20.99).
- GPIO Extender Header Kit 14-Piece, 2×20 Stacking Female Headers for Raspberry Pi and Pico, $17.99 on sale (regular $21.99).
- Pin Header Set 30-Piece for Raspberry Pi Pico, $11.99 on sale (regular $14.99).
Shop the full range: Raspberry Pi and Pico at Quality RC Parts. In-stock parts ship from Queensbury, NY, USA in 1 to 2 business days. QRC ships within the USA only.
Quality RC Parts ships within the USA only. Orders ship from Queensbury, NY.
FAQ
What programming language should I use with Raspberry Pi Pico?
Start with MicroPython. It gives instant feedback, and every kit in this guide supports it. Move to C or C++ when the project needs speed or precise timing. (Source: Microcontrollers Lab FAQ section; confirmed by the Raspberry Pi Pico-series documentation, which lists MicroPython, C, and C++ as the programming options.)
Is Raspberry Pi Pico better than Arduino?
Neither is better in general. The Pico is faster, with a dual-core 133 MHz chip against the Arduino UNO 16 MHz, and cheaper, with better MicroPython support. Arduino has a larger legacy library and more beginner tutorials. For a new learner in 2026, the Pico W has the advantage of built-in Wi-Fi. (Source: Microcontrollers Lab FAQ section.)
Can Raspberry Pi Pico W connect to the internet?
Yes. The Pico W includes 2.4 GHz 802.11n Wi-Fi, so it can connect to a router, serve a web page, and report sensor data. The SunFounder kit includes IoT projects built for this. (Source: Microcontrollers Lab FAQ section; confirmed by the Raspberry Pi Pico-series documentation.)
Which Pico kit is best for a complete beginner?
The SunFounder Pico W Ultimate Starter Kit. It has the board, 450 plus components, 117 projects, and 27 video tutorials in one box, and it is built for beginners aged 8 and up. The LAFVIN kit is the budget alternative for a beginner who does not need Wi-Fi. (Source: Step 2 research notes; Microcontrollers Lab names the same SunFounder kit its best overall pick.)
Do I need a Pico W, or is the standard Pico enough?
The standard Pico is enough for wired projects: sensors, displays, servos, and buttons all run the same on either board. Buy the Pico W when the project must connect, such as a web dashboard or a sensor that reports over Wi-Fi. Only the SunFounder kit in this guide ships a Pico W. (Source: Step 2 research notes; confirmed by the QRC board comparison page.)
What is the difference between Pico, Pico W, and Pico 2 W?
Pico and Pico W share the RP2040 chip, 133 MHz, 264 KB SRAM, and 2 MB flash. The W adds 2.4 GHz Wi-Fi and Bluetooth 5.2. Pico 2 W uses the RP2350 chip, with Cortex-M33 cores up to 150 MHz, 520 KB SRAM, and 4 MB flash, plus Wi-Fi and Bluetooth 5.2. This guide lists no Pico 2 W kit. (Source: Step 2 research notes; confirmed by the QRC board comparison page and the Raspberry Pi Pico-series documentation.)
Does the kit include the Pico board, or do I buy it separately?
Three of the four kits in this guide include the board: SunFounder (Pico W), LAFVIN (Pico), and Keyestudio (Pico). The UCTRONICS GPIO breakout kit does not include a board. Check the listing before you buy. (Source: Step 2 research notes; confirmed by the live QRC listings.)
Do I need to solder the header pins?
It depends on the board. Kits that ship with headers fitted, marked H or with headers, need no soldering. Boards without fitted headers need the pins fitted before they go on a breadboard. The Keyestudio kit includes headers that need fitting. (Source: Microcontrollers Lab FAQ section; confirmed by the Raspberry Pi Pico-series documentation, which says models without the H suffix need pins soldered manually or a third-party pin kit.)
Related guides
- Raspberry Pi Pico vs Pico W vs Pico 2: Chip, Wireless, and Headers
- How to Pick a Microcontroller Starter Kit for Beginners
- Breadboard Prototyping Essentials: Boards, Wires, Headers, and Cables
- Which ESP32 Board to Pick: DevKit V1, S2 Mini, or SuperMini
- How to Pick an ESP32 SuperMini Board for Tiny Builds
- Which ESP32 Board to Pick: DevKit V1, S2 Mini, or SuperMini
- Raspberry Pi & Pico
Sources
- Raspberry Pi Pico-series documentation, models and key features
- Raspberry Pi Pico Datasheet
- Microcontrollers Lab, Best Raspberry Pi Pico Kits and Bundles in 2026
- ETechnophiles, 5 Best R-Pi Pico Kits for Beginners in 2026
- iTechGuides, Raspberry Pi Pico 2: Arm, RISC-V, Specs, Price, and Pico 2 W
- MakerGuides, Arduino vs Pico Elecrow Starter Kit
- Kuongshun, Raspberry Pi Pico kits
- Medium, Which Raspberry Pi Kit Should I Buy for My Project?
- Quality RC Parts live product listings, verified via WooCommerce Store API 2026-11-21: SunFounder Pico W Ultimate Starter Kit (ID 20340), LAFVIN Basic Starter Kit (ID 20339), KEYESTUDIO Pico Basic Starter Kit (ID 20338), UCTRONICS GPIO Breakout Kit (ID 20337), Waveshare 1.3 Inch LCD Display (ID 20344), C4Labs Zebra Pico Case (ID 20341), GPIO Extender Header Kit (ID 20342), Pin Header Set 30-Piece (ID 20343)
- Quality RC Parts, Raspberry Pi Pico vs Pico W vs Pico 2
Last updated: 2026-11-21
Orders earn QRC Rewards points.
Shipped fast and securely from our secure facility in New York, providing fast, high quality USA shipping.