
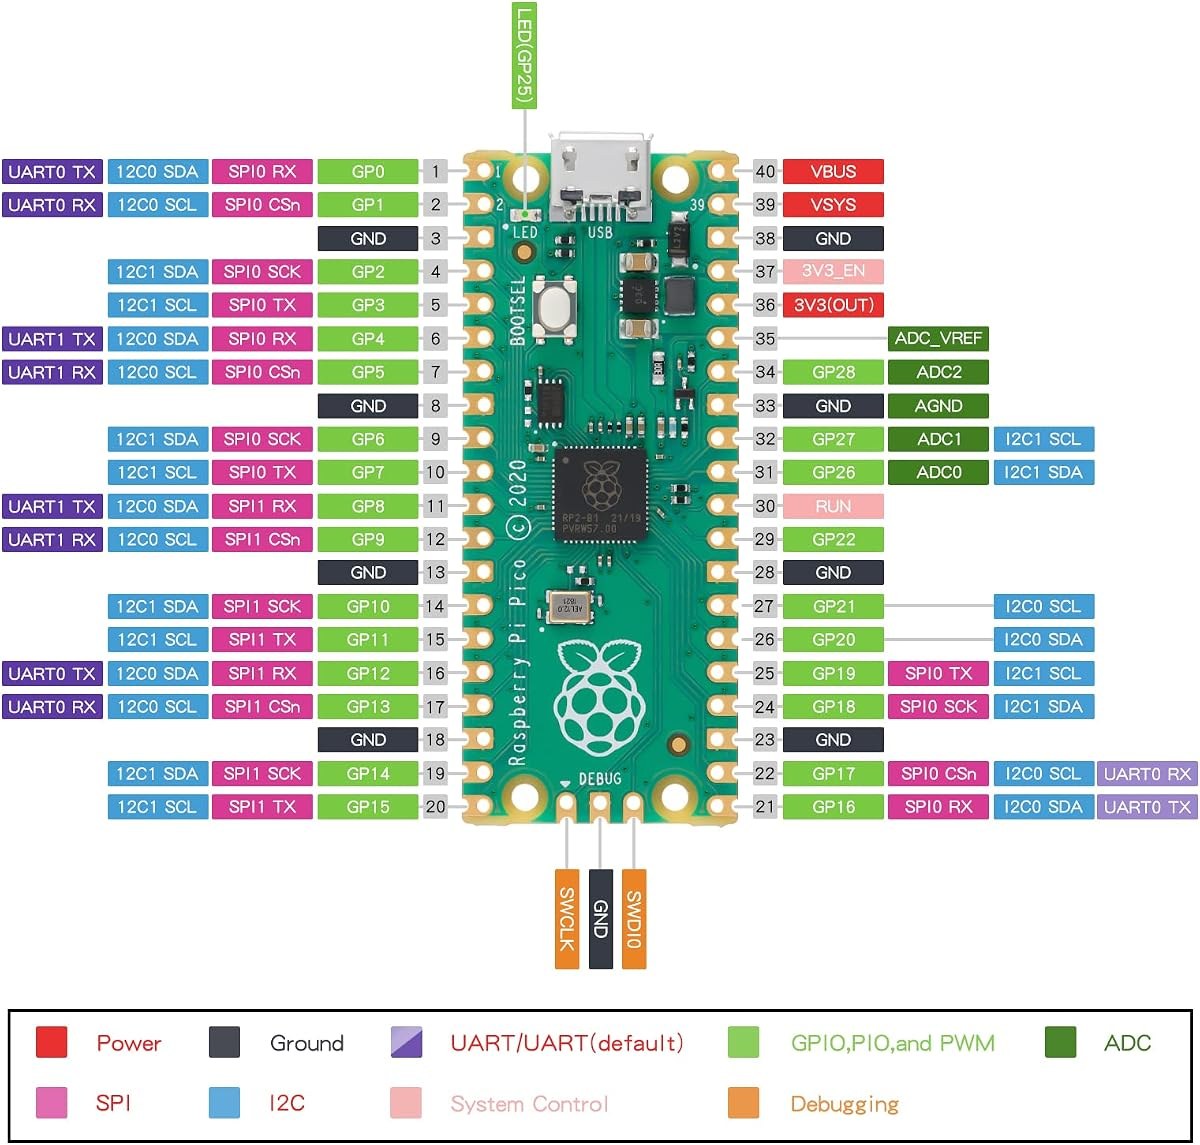
MicroPython Raspberry Pi Pico: Flash and First Script
MicroPython Raspberry Pi Pico runs from a UF2 firmware file for your exact Pico model: download it from the MicroPython downloads page, hold BOOTSEL while you plug the board in, drag the UF2 file onto the RPI-RP2 drive, then open Thonny and select MicroPython (Raspberry Pi Pico). The drive disappears and the board reboots with MicroPython.
Quick facts
- Firmware: a .uf2 file for your exact Pico model, from the MicroPython downloads page.
- Boot mode: hold BOOTSEL while you plug the USB cable in. The board appears as a drive named RPI-RP2.
- Editor: Thonny, free, with MicroPython (Raspberry Pi Pico) as the interpreter.
- On-board LED: Pin(“LED”) in MicroPython works on Pico and on Pico W.
- Boot files: boot.py runs first, then main.py runs at power on.
Which Pico board do you have?
Match the firmware to the exact board. The original Pico uses the RP2040 chip and 2 MB of flash. The Pico W adds WiFi and Bluetooth. The Pico WH is a Pico W with pre-soldered headers. The Pico 2 uses the RP2350 chip and 4 MB of flash. The Pico 2 W adds WiFi and Bluetooth to the Pico 2. Each model has its own UF2 file on the MicroPython downloads page. A Pico W file will not work on a Pico 2 board. Read the model name on the board or the shop listing before you download. The boards in this guide are the original Pico and the Pico WH.
Check the USB cable before you start. Pico uses a micro USB cable, and the cable must carry data. A charge-only cable will not mount the drive and will not show a port. Use a cable you have used for file transfer. Keep the board bare for the first flash. Do not connect sensors or a breadboard yet. A bare board removes every wiring variable from the install.
How do you flash the MicroPython UF2 file?
Download the UF2 file for your exact Pico model from the MicroPython downloads page. Pick the latest stable release. Save the file where you can find it. Unplug the Pico if it is already connected. Hold the white BOOTSEL button on the board. Keep holding it while you plug the USB cable into the computer. Release BOOTSEL after a few seconds. The board appears as a removable drive named RPI-RP2. On a Pico 2 board, the drive is named RP2350 instead.
Drag the UF2 file onto the RPI-RP2 drive. The drive disappears after a few seconds, and the board reboots with MicroPython. That is the whole flash. No installer, no command line, and no driver is needed for the flash step. On a Pico 2 board, the drive is named RP2350, not RPI-RP2. If the drive does not appear, the cable is the most likely cause. Try a different micro USB data cable and a different USB port. If the drive appears but the UF2 file stays on the drive, the file is for the wrong Pico model. Download the UF2 file for your exact model and repeat the drag and drop.
How do you set up Thonny for Pico?
Download Thonny from the official Thonny site and install it for your operating system. Thonny is free and it includes MicroPython support. Plug the Pico into the computer after the flash. Open Thonny and click the interpreter selector in the bottom-right corner. Choose MicroPython (Raspberry Pi Pico) from the list. Pick the serial port for the Pico if Thonny asks. The Shell pane should show the MicroPython version, the board name, and a >>> prompt. Type 1 + 1 and press Enter. The Shell prints 2. That confirms the REPL is live.
If Thonny does not list the Pico port, unplug the board and watch the port list change, then plug it back in. On Windows, the Pico port appears as a COM port. On Linux, it appears as /dev/ttyACM0. On macOS, it appears as a cu.usbmodem device. Close any other program that holds the serial port open. One program owns the port at a time. If the Shell shows no prompt, press Enter in the Shell once, then press Ctrl+C to interrupt any running program.
What is the REPL and how do you test a pin?
The REPL is the interactive Python prompt on the board. It runs one line at a time and prints the result. Type import sys, then sys.version, to read the MicroPython version. Type help() for a short list of built-in functions. The REPL is the fastest way to test hardware. Connect a sensor, import the driver in the REPL, and read a value before you write a file. That loop catches wiring errors in seconds. The Pico REPL also shows a traceback when a line fails, with the line number and the error type. Read the last line of the traceback first, because it names the error.
Test the on-board LED from the REPL. Type from machine import Pin, then led = Pin(“LED”, Pin.OUT), then led.on(). The LED lights. Type led.off() to turn it off. The string “LED” maps to the right pin on each Pico model. On the original Pico, it is GPIO 25. On the Pico W and Pico WH, the LED connects through the wireless chip, and the string “LED” still works. Do not use Pin(25) on a Pico W board, because that pin does not drive the LED. The string form is the portable choice across Pico models.
How do you save and run a first script?
Write the program in the Thonny editor pane. Click Run and Thonny asks where to save the file. Pick the Raspberry Pi Pico as the destination and name the file main.py. MicroPython runs boot.py first at power on, then it runs main.py. Do not overwrite boot.py unless you know what it does. Keep boot.py as it shipped and put your code in main.py. That is 2 files in order: boot.py, then main.py. The Run button saves the file to the board and starts it. The Shell shows the output and any error. A NameError means a name is misspelled or not imported. An ImportError means a module is missing.
Test the script, then unplug the board and plug it back in. The script should start on its own, because main.py runs at boot. That is the test that matters for a standalone project. If the script does not start, open Thonny and check the Shell for a traceback. The most common cause is a typo in a pin name or a missing import. Fix it, save again, and repeat the unplug test. Keep the first script short. A Blink program that you can trust is worth more than a long program that fails silently.
How do you use WiFi on a Pico W board?
The Pico WH board in this guide has WiFi and Bluetooth through the wireless chip. MicroPython on Pico W includes the network module. Connect with network.WLAN(network.STA_IF), then call active(True) and connect(ssid, password). Wait for isconnected() to return True before you send data. The Pico W draws more current with WiFi on, so power it from a good USB port or a 5 V supply rated for at least 1 A. A weak port can reset the board when WiFi starts. The original Pico has no wireless hardware, so the network module is not available on it. Do not copy a Pico W WiFi script to a Pico board and expect it to run.
Start with a short WiFi test in the REPL. Connect, print the IP address with wlan.ifconfig(), then disconnect. That test proves the credentials and the signal before you build a larger program. Keep the password out of any file you share. A shared main.py with a real password is a security risk. Store the password in a separate file or type it in the REPL for a test. The full WiFi telemetry project in this series builds on this test, and it uses the same connect sequence.
Step-by-step: MicroPython Raspberry Pi Pico flash and Blink
- Download the MicroPython UF2 file for your exact Pico model from the MicroPython downloads page.
- Hold the BOOTSEL button while you plug the micro USB cable into the computer, then release BOOTSEL.
- Confirm the board appears as a removable drive named RPI-RP2 (RP2350 on a Pico 2 board).
- Drag the UF2 file onto the RPI-RP2 drive (RP2350 on a Pico 2 board) and wait for the drive to disappear.
- Install Thonny from the official Thonny site if it is not already installed.
- Open Thonny, click the interpreter selector in the bottom-right corner, and choose MicroPython (Raspberry Pi Pico).
- Pick the serial port for the Pico and confirm the Shell shows a >>> prompt.
- Type print(1 + 1) in the Shell and confirm it prints 2.
- Save the Blink script below as main.py on the Pico, click Run, and watch the LED blink.
- Unplug the board and plug it back in to confirm the script starts at boot.
UF2 firmware and LED for each Pico model
| Pico model | Chip | MicroPython firmware | LED in code |
|---|---|---|---|
| Raspberry Pi Pico | RP2040 | Pico UF2 | Pin(“LED”) |
| Raspberry Pi Pico W | RP2040 | Pico W UF2 | Pin(“LED”) |
| Raspberry Pi Pico WH | RP2040 | Pico W UF2 | Pin(“LED”) |
| Raspberry Pi Pico 2 | RP2350 | Pico 2 UF2 | Pin(“LED”) |
| Raspberry Pi Pico 2 W | RP2350 | Pico 2 W UF2 | Pin(“LED”) |
First code to run
Save this file as main.py on the Pico in Thonny. It blinks the on-board LED once per second and prints each state to the Shell.
# main.py - MicroPython Blink for Raspberry Pi Pico
# Board: Raspberry Pi Pico or Pico WH
# Library: machine (built into MicroPython, no install needed)
from machine import Pin
from time import sleep

# Pin("LED") works on Pico and on Pico W. Do not use Pin(25) on Pico W.
led = Pin("LED", Pin.OUT)

while True:
    led.on()      # Turn the LED on
    print("LED on")
    sleep(1)      # Wait 1 second
    led.off()     # Turn the LED off
    print("LED off")
    sleep(1)      # Wait 1 second
On a Pico 2 board, use the Pico 2 UF2 firmware file. The same Pin(“LED”) code works on Pico 2 and Pico 2 W.
Frequently asked questions
How do I get MicroPython back after using Arduino on Pico?
Hold BOOTSEL while you plug the board in, then drag the MicroPython UF2 file onto the RPI-RP2 drive (RP2350 on a Pico 2 board). The flash replaces the Arduino program. Repeat the same steps any time you switch frameworks.
Why does the RPI-RP2 drive not appear?
The cable is the most likely cause. Use a micro USB data cable, not a charge-only cable. Try a different cable and a different USB port. The drive appears only while you hold BOOTSEL during plug-in.
Can I use the Pico W LED with Pin(25)?
No. On Pico W and Pico WH, the LED connects through the wireless chip, not GPIO 25. Use Pin(“LED”, Pin.OUT) in MicroPython. That form works on Pico, Pico W, Pico 2, and Pico 2 W.
What is the difference between boot.py and main.py?
boot.py runs first at power on, then main.py runs. Keep boot.py as it shipped and put your program in main.py. A broken boot.py can block the REPL and force a reflash.
How do I install a MicroPython library on Pico?
Copy the .py library file to the Pico with Thonny, using File, Save As, then pick the Pico as the destination. Or use mip in the REPL to install from the MicroPython package index when the board has internet access.
Parts used in this guide
This guide flashes the Raspberry Pi Pico board and the Pico WH board linked below. Download the UF2 file for your exact model from the MicroPython downloads page.
- Raspberry Pi Pico Development Board 2-Pack, RP2040
- Raspberry Pi Pico WH, Pre-Soldered Headers, WiFi + Bluetooth
Related guides
- RP2040 vs ESP32: PIO, Radios, and Which Board to Pick
- Arduino IDE for Raspberry Pi Pico: Install the RP2040 Core
- MicroPython on ESP32: Flash, REPL, and First Script
Sources
- Raspberry Pi Pico with MicroPython quick-start
- Programming Raspberry Pi Pico with Python and MicroPython
- MicroPython install on ESP32
- MicroPython with esptool and Thonny
Last updated: 2026-11-21