
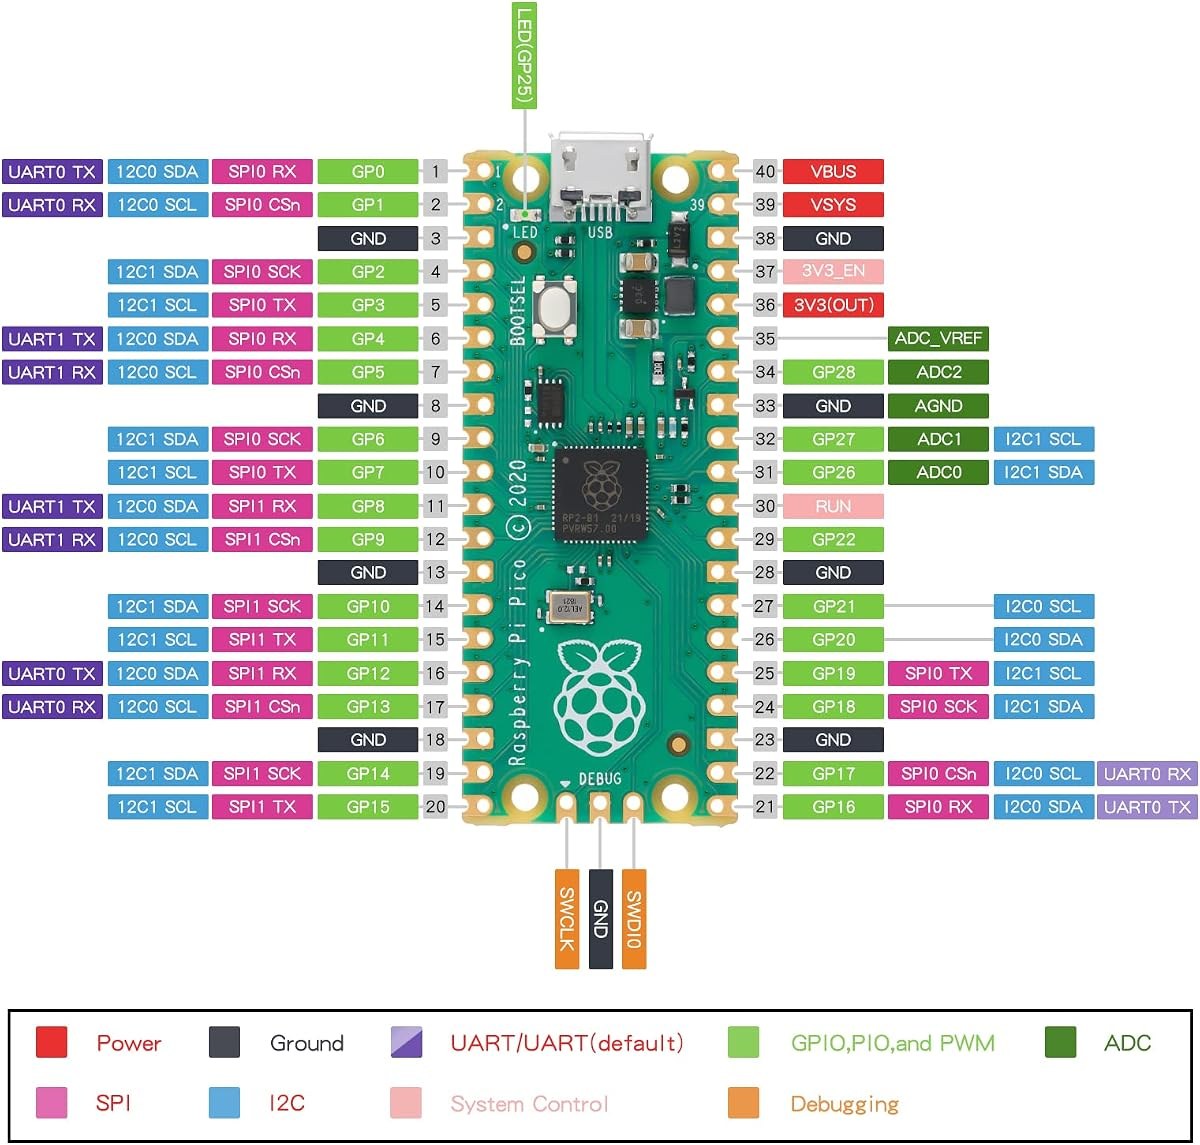
Arduino IDE Raspberry Pi Pico: Install the RP2040 Core
Arduino IDE Raspberry Pi Pico setup starts with the Arduino-Pico board manager URL: add it to Preferences, install Raspberry Pi Pico/RP2040/RP2350 by Earle F. Philhower, III in Boards Manager, then select Raspberry Pi Pico under Tools, Board. The URL is https://github.com/earlephilhower/arduino-pico/releases/download/global/package_rp2040_index.json. Hold BOOTSEL while you plug the board in for the first upload.
Quick facts
- Core: Arduino-Pico by Earle F. Philhower, III, for RP2040 and RP2350 boards.
- Board manager URL: https://github.com/earlephilhower/arduino-pico/releases/download/global/package_rp2040_index.json
- Board entry: Raspberry Pi Pico under Raspberry Pi RP2040 Boards.
- First upload: hold BOOTSEL while you plug the board in, then pick the port.
- Logic level: 3.3 V. Never feed 5 V into a GPIO pin.
Why use Arduino on Pico instead of MicroPython?
Arduino on Pico gives you the Arduino API on RP2040 hardware. You write setup and loop, you use digitalWrite and analogRead, and you reuse Arduino libraries. That matters when a project already has Arduino code, or when a library exists only for Arduino. MicroPython is faster to test line by line, but Arduino is faster to port from an Uno or a Nano project. The Pico chip is strong in both frameworks. It has two cores, 264 KB of SRAM, and 2 MB of flash on the original Pico. Arduino uses that hardware well, and the core adds Pico-only features such as the programmable I/O blocks.
The Arduino-Pico core is a community project by Earle F. Philhower, III. It is not the official Raspberry Pi C SDK, and it is not an Arduino official core. It is the core that most tutorials use, and it supports Pico, Pico W, Pico 2, and Pico 2 W, plus many RP2040 boards. Install it through Boards Manager with the URL in this guide. Do not install a different RP2040 package at the same time, because two cores can fight over the same board names. Pick the Philhower core and stay with it.
How do you install the Arduino-Pico core?
Install Arduino IDE 2 from the official Arduino site if it is not already installed. Open Arduino IDE and go to File, Preferences on Windows and Linux, or Arduino IDE, Settings on macOS. Find Additional boards manager URLs. Paste this URL on its own line: https://github.com/earlephilhower/arduino-pico/releases/download/global/package_rp2040_index.json. If the field already holds other URLs, add this one on a new line or after a comma. Click OK. This URL points to a JSON index that tells Boards Manager where to fetch the core. Do not paste the GitHub repository page instead.
Open Tools, Board, Boards Manager. Type pico or RP2040 in the search box. Find Raspberry Pi Pico/RP2040/RP2350 by Earle F. Philhower, III and click Install. The download includes the ARM compiler toolchain, so allow several minutes. When the install finishes, close Boards Manager. Open Tools, Board and confirm that a Raspberry Pi RP2040 Boards section now appears. If it is missing, restart the IDE and check the URL for a typo. The core version changes over time, and the install picks the current release.
How do you select the Pico board and port?
Open Tools, Board, Raspberry Pi RP2040 Boards, and select Raspberry Pi Pico. For a Pico W board, select Raspberry Pi Pico W. For a Pico 2 board, select Raspberry Pi Pico 2. The board entry sets the chip, the flash size, and the upload method. A wrong entry can compile but fail to run, so match the model on your board. The Tools menu also holds Pico-specific options, such as CPU speed, flash size, and the USB stack. Leave them at their defaults for the first sketch. The defaults run the Pico at 133 MHz with the standard flash layout.
Hold the BOOTSEL button while you plug the micro USB cable into the computer, then release BOOTSEL. The Pico appears as a USB drive for a moment, then the IDE sees a serial port. Pick that port under Tools, Port. On Windows it is a COM port. On Linux it is /dev/ttyACM0. On macOS it is a cu.usbmodem device. Unplug the board and watch the port disappear to confirm it belongs to your Pico. After the first upload, the Pico reboots into the sketch, and later uploads use the normal port without BOOTSEL. If the port vanishes after an upload, hold BOOTSEL and plug the board in again.
What does the first Arduino sketch do?
Open File, Examples, 01.Basics, Blink. The sketch sets LED_BUILTIN as an output in setup and toggles it in loop. On the Pico, LED_BUILTIN is GPIO 25. On a Pico W board, the LED connects through the wireless chip, and the core maps LED_BUILTIN to it. Click Upload. The IDE compiles the sketch, writes it to the Pico, and the board reboots into Blink. The LED blinks once per second. That confirms the core install, the board selection, and the port. If the upload fails with a port error, close the Serial Monitor and any other program that holds the port open.
The Blink example uses no libraries and no wiring. Keep the board bare for this test. A sensor or a motor on the same pins can change the result and waste your time. When Blink works, add one part at a time. The next step is a button or a sensor on a GPIO pin, with the pin number from the Pico pinout guide in this series. Pico GPIO pins run at 3.3 V logic. Never connect 5 V logic to a Pico pin. Use a level shifter when a 5 V sensor output must reach the Pico.
What if the upload fails?
Work the chain in order: cable, BOOTSEL, port, board entry, then core install. Swap the micro USB cable first. A charge-only cable powers the board but carries no data. Next, hold BOOTSEL while you plug the board in, then pick the port that appears. If no port appears, try a different USB port on the computer. Then check the board entry under Tools, Board. A Pico W entry on a Pico board can fail to run. Reinstall the core only after the cable, port, and board entry all check out. A reinstall fixes a broken toolchain download, but it does not fix a bad cable.
Read the output panel before you change a setting. A not in sync error points at the port or the bootloader. A board not found error points at the board entry. A compile error that names a missing library points at the sketch, not the core. Change one thing, retry the upload, and note the result. Do not change the board entry, the port, and the cable at once, because you will not know which change fixed it. The troubleshooting guides in this series cover the Nano bootloader and the ESP32 upload errors with the same one-change method.
How do you use Pico-only features in Arduino?
The Arduino-Pico core exposes the RP2040 programmable I/O blocks, the second core, and the hardware PWM through extra libraries and functions. The core documentation on the Arduino-Pico readthedocs site lists them. Start with the standard Arduino API first. Use digitalWrite, analogRead, and Serial until the project works. Add a Pico-only feature when the standard API cannot do the job, such as a precise waveform or a second core task. The PIO blocks run small programs on their own, and they can drive WS2812 LEDs or read a rotary encoder without CPU time. That is a later step, not a first sketch.
The core also supports LittleFS for file storage on the Pico flash. That lets a data logger save readings without an SD card. The RP2040 vs ESP32 comparison in this series explains when Pico is the right pick and when ESP32 wins on WiFi. For a first Arduino project on Pico, the standard API is enough. Learn the board, the port, and the upload cycle first. Add the advanced features when the project needs them.
Step-by-step: Arduino IDE Raspberry Pi Pico setup and Blink upload
- Install Arduino IDE 2 and launch it.
- Open File, Preferences and add https://github.com/earlephilhower/arduino-pico/releases/download/global/package_rp2040_index.json to Additional boards manager URLs, then click OK.
- Open Tools, Board, Boards Manager, search for RP2040, and install Raspberry Pi Pico/RP2040/RP2350 by Earle F. Philhower, III.
- Open Tools, Board, Raspberry Pi RP2040 Boards, and select Raspberry Pi Pico.
- Hold BOOTSEL while you plug the micro USB cable into the computer, then release BOOTSEL.
- Open Tools, Port and select the port that appeared for the Pico.
- Open File, Examples, 01.Basics, Blink.
- Click Upload and wait for Done uploading in the output panel.
- Watch the on-board LED blink once per second.
Board entry for each Pico model in stock
| Pico model | Chip | Board entry in Arduino IDE | Notes |
|---|---|---|---|
| Raspberry Pi Pico | RP2040 | Raspberry Pi Pico | 2 MB flash, no wireless |
| Raspberry Pi Pico WH | RP2040 | Raspberry Pi Pico W | WiFi and Bluetooth, pre-soldered headers |
| Raspberry Pi Pico 2 | RP2350 | Raspberry Pi Pico 2 | 4 MB flash, no wireless |
| Raspberry Pi Pico 2 W | RP2350 | Raspberry Pi Pico 2 W | WiFi and Bluetooth |
First code to run
Paste this sketch into a new sketch if the built-in Blink example is not listed. It is the same code as File, Examples, 01.Basics, Blink, with comments added.
// Blink for Raspberry Pi Pico in Arduino IDE
// Board: Raspberry Pi Pico (Arduino-Pico core by Earle F. Philhower, III)
// Library: none. Uses only the Arduino core.
// LED_BUILTIN is GPIO 25 on Pico. On Pico W it maps to the wireless chip LED.
void setup() {
  pinMode(LED_BUILTIN, OUTPUT);  // Set the on-board LED pin as an output
}

void loop() {
  digitalWrite(LED_BUILTIN, HIGH);  // Turn the LED on
  delay(1000);                      // Wait 1000 ms (1 second)
  digitalWrite(LED_BUILTIN, LOW);   // Turn the LED off
  delay(1000);                      // Wait 1000 ms (1 second)
}
Do not use the Windows Store version of Arduino IDE for Pico work. The Arduino-Pico documentation warns that the Store version has issues detecting Pico boards. Use the installer from the Arduino site.
Frequently asked questions
Which core should I install for Raspberry Pi Pico in Arduino IDE?
Install the Arduino-Pico core by Earle F. Philhower, III. It is the core that most tutorials use, and it supports Pico, Pico W, Pico 2, and Pico 2 W. Add its board manager URL to Preferences, then install it in Boards Manager.
Why do I need BOOTSEL for the first Arduino upload?
Pico ships with no Arduino bootloader. Holding BOOTSEL while you plug the board in puts it in USB mass storage mode, so the IDE can write the sketch. Later uploads use the normal serial port without BOOTSEL.
Can I switch a Pico between Arduino and MicroPython?
Yes. Flash the MicroPython UF2 file to go to Python, or upload an Arduino sketch to go back to Arduino. Each switch replaces the firmware on the board. The MicroPython guide in this series covers the UF2 steps.
Does Arduino on Pico support WiFi on Pico W?
Yes, through the WiFi library in the Arduino-Pico core. The Pico W board has WiFi and Bluetooth hardware. The original Pico has no wireless hardware, so WiFi code will not run on it.
What CPU speed does Pico run at in Arduino?
The default is 133 MHz. The Tools menu lets you change it. Leave the default for a first sketch, because a higher speed changes timing and power use without helping a Blink program.
Parts used in this guide
This guide installs the RP2040 core for the Raspberry Pi Pico board and the Pico board with pre-soldered header linked below. Pick the board entry that matches your model.
Related guides
- RP2040 vs ESP32: PIO, Radios, and Which Board to Pick
- MicroPython on Raspberry Pi Pico: Flash and First Script
- How to Set Up Arduino IDE for ESP32 Boards
Sources
- Arduino-Pico installation guide
- Adafruit: Using Raspberry Pi Pico with Arduino
- Adafruit: Program RP2040 in Arduino
Last updated: 2026-11-21